Using LoopingSelector from the Silverlight Toolkit
21 Nov 2010 by Nigel Sampson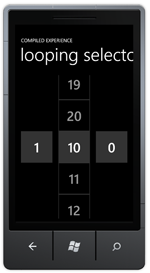
The Silverlight Toolkit for Windows Phone 7 contains a lot of really useful controls, including the DateSelector with it’s very cool infinite list selector. What would be nice to be to have that sort of list for other types of data. Thankfully the team at Microsoft has made this possible.
Edit: I’ve uploaded some sample code at Silverlight Toolkit LoopingSelector Demo.
The DateSelector control builds off a simpler control named LoopingSelector which contains all the functionality for the looping control, we just need to provide the description of the available data. We do this through the interface ILoopingSelectorDataSource, for our simple example we’ll use a numerical data source with a minimum and maximum.
The interface is pretty self explanatory, GetPrevious and GetNext methods allow you to define the order of the data. We use the SelectedItem property to hold a reference to currently selected item and use the SelectionChanged event to notify the control when the SelectedItem changes (we change it from within code for instance).
Here’s our implementation of NumericDataSource.
public class NumbersDataSource : ILoopingSelectorDataSource
{
    private int minimum = 1;
    private int maximum = 100;
    private int selectedItem = 1;

    public event EventHandler<SelectionChangedEventArgs> SelectionChanged;

    protected virtual void OnSelectedChanged(SelectionChangedEventArgs e)
    {
        var selectionChanged = SelectionChanged;

        if(selectionChanged != null)
            selectionChanged(this, e);
    }

    public object GetNext(object relativeTo)
    {
        var nextValue = ((int)relativeTo) + 1;

        return nextValue <= Maximum ? nextValue : Minimum;
    }

    public object GetPrevious(object relativeTo)
    {
        var previousValue = ((int)relativeTo) - 1;

        return previousValue >= Minimum ? previousValue : Maximum;
    }

    public object SelectedItem
    {
        get
        {
            return selectedItem;
        }
        set
        {
            var oldValue = selectedItem;
            var newValue = (int)value;

            if(oldValue == newValue)
                return;

            selectedItem = newValue;

            OnSelectedChanged(new SelectionChangedEventArgs(new[] { oldValue}, new[] { newValue }));
        }
    }

    public int Minimum
    {
        get
        {
            return minimum;
        }
        set
        {
            minimum = value;

            if(selectedItem < minimum)
                SelectedItem = value;
        }
    }


    public int Maximum
    {
        get
        {
            return maximum;
        }
        set
        {
            maximum = value;

            if(selectedItem > maximum)
                SelectedItem = value;
        }
    }
}
Now that we have our data source it’s time to add a few controls to our page for this example we’ll add three to mimic the style of the DateSelector. From my experimentaion I’ve found that a number of properties need to be set on the LoopingSelector for it to work correctly, specifically ItemSize and Width, both are fairly obvious but nessecary. For each Selector we’ll create a seperate instance of our data source with some different parameters. We’ll also create a DataTemplate resource and share that amongst the selectors.
The resulting xaml is as follows.
<Grid x:Name="ContentPanel" Grid.Row="1" Margin="12,0,12,0">
    <Grid.Resources>
        <DataTemplate x:Key="NumberTemplate">
            <Grid>
                <TextBlock Text="{Binding}" FontSize="54" FontFamily="{StaticResource PhoneFontFamilySemiBold}" HorizontalAlignment="Center" VerticalAlignment="Center" />
            </Grid>
        </DataTemplate>
    </Grid.Resources>
    <Grid.ColumnDefinitions>
        <ColumnDefinition Width="*"/>
        <ColumnDefinition Width="*"/>
        <ColumnDefinition Width="*"/>
    </Grid.ColumnDefinitions>
    <controls:LoopingSelector Margin="12" Width="128" ItemSize="128,128" ItemTemplate="{StaticResource NumberTemplate}">
        <controls:LoopingSelector.DataSource>
            <local:NumbersDataSource />
        </controls:LoopingSelector.DataSource>
    </controls:LoopingSelector>
    <controls:LoopingSelector Grid.Column="1" Margin="12" Width="128" ItemSize="128,128" ItemTemplate="{StaticResource NumberTemplate}">
        <controls:LoopingSelector.DataSource>
            <local:NumbersDataSource Minimum="10" Maximum="20" />
        </controls:LoopingSelector.DataSource>
    </controls:LoopingSelector>
    <controls:LoopingSelector Grid.Column="2" Margin="12" Width="128" ItemSize="128,128" ItemTemplate="{StaticResource NumberTemplate}">
        <controls:LoopingSelector.DataSource>
            <local:NumbersDataSource Maximum="0" Minimum="-100" />
        </controls:LoopingSelector.DataSource>
    </controls:LoopingSelector>
</Grid>
Edit: I’ve uploaded some sample code at Silverlight Toolkit LoopingSelector Demo.


