WP7 Context Menus with Caliburn Micro
13 May 2011 by Nigel Sampson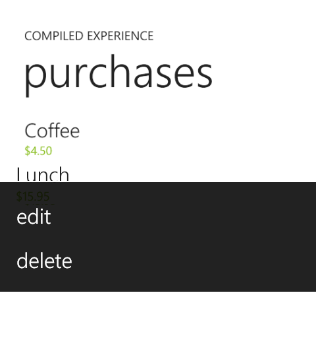 Context Menus in all the xaml based frameworks (WPF, Silverlight and WP7) are tricky little beasts waiting to trip people up. In WP7 they’re provided by the awesome Silverlight Toolkit. The major problem is that they don’t exist in the visual tree in the way standard elements do. This inhibits things in Caliburn Micro (CM) like action bubbling (the process where an Action bubbles through the visual tree to find a Target that can handle it).
However the first thing we need to do it set up some conventions for the Context Menu, it CM doesn’t know about the element it’ll use the Loaded event to fire actions, we’d much rather use the Click event. Add the following to the Configure method of the Bootstrapper.
ConventionManager.AddElementConvention<MenuItem>(ItemsControl.ItemsSourceProperty, "DataContext", "Click");
The method to solving this is the use of the attached dependency property Action.TargetWithoutContext from CM. By default the Target for Actions is the ViewModel bound as the DataContext, with this property we can set the target for the Actions to be something else. What this is will depend a bit on the scenario, I’ll cover two such scenarios in this post.
Both of the scenarios will deal the most common uses for a context menu which is a set of actions on a list of data. For the example we’ll have a list of Purchases that we’ll want to edit and delete.
The first and slightly simpler scenario is the one where the Edit and Delete methods exist on the PurchaseViewModel.
public class PurchaseViewModel : PropertyChangedBase
{
    private decimal cost;
    private string description;

    public PurchaseViewModel(decimal cost = 0.00m, string description = "")
    {
        this.cost = cost;
        this.description = description;
    }

    public decimal Cost
    {
        get { return cost; }
        set
        {
            cost = value;
            NotifyOfPropertyChange("Cost");
        }
    }

    public string Description
    {
        get { return description; }
        set
        {
            description = value;
            NotifyOfPropertyChange("");
        }
    }

    public void Edit()
    {
        MessageBox.Show("Editing " + Description, "Edit", MessageBoxButton.OK);
    }

    public void Delete()
    {
        MessageBox.Show("Deleting " + Description, "Delete", MessageBoxButton.OK);
    }
}

public class PurchaseListViewModel : Screen
{
    public PurchaseListViewModel()
    {
        Purchases = new BindableCollection<PurchaseViewModel>
                        {
                            new PurchaseViewModel(4.50m, "Coffee"),
                            new PurchaseViewModel(15.95m, "Lunch")
                        };
    }

    public IObservableCollection<PurchaseViewModel> Purchases
    {
        get;
        set;
    }
}
In this scenario we’re pretty good right out of the box, and don’t need to deal with the action bubbling as the current Target (the PurchaseViewModel) will be able to handle the Action.
<ListBox x:Name="Purchases">
    <ListBox.ItemTemplate>
        <DataTemplate>
            <StackPanel Width="456" d:DesignWidth="275" Margin="0,0,0,12" Background="Transparent">
                <toolkit:ContextMenuService.ContextMenu>
                    <toolkit:ContextMenu>
                        <toolkit:MenuItem Header="edit" caliburn:Message.Attach="Edit"/>
                        <toolkit:MenuItem Header="delete" caliburn:Message.Attach="Delete"/>
                    </toolkit:ContextMenu>
                </toolkit:ContextMenuService.ContextMenu>
                <TextBlock Text="{Binding Description}" Style="{StaticResource PhoneTextLargeStyle}" VerticalAlignment="Bottom"/>
                <TextBlock Text="{Binding Cost, ConverterParameter=\{0:C\}, Converter={StaticResource StringFormat}}" Style="{StaticResource PhoneTextSmallStyle}" VerticalAlignment="Bottom" Foreground="{StaticResource PhoneAccentBrush}"/>
            </StackPanel>
        </DataTemplate>
    </ListBox.ItemTemplate>
</ListBox>
The second scenario (and in my opinion the more likely) is where the Edit and Delete methods exist on the PurchaseListViewModel and take the PurchaseViewModel as a parameter.
public void Edit(PurchaseViewModel purchase)
{
    MessageBox.Show("Editing " + purchase.Description, "Edit", MessageBoxButton.OK);
}

public void Delete(PurchaseViewModel purchase)
{
    MessageBox.Show("Deleting " + purchase.Description, "Delete", MessageBoxButton.OK);
}
This one is a little more complicated, not only do we need to set the Target but we don’t have easy access to the PurchaseListViewModel. I’ve seen solutions in WPF and Silverlight using RelativeSource bindings which aren’t available, thankfully we can still used ElementName bindings. The idea is that we can get the DataContext of the ListBox (the PurchaseListViewModel) through an element name binding and set that as the Target). We then use the $dataContext shortcut to pass the current DataContext (the PurchaseViewModel) as a parameter.
<ListBox x:Name="Purchases">
    <ListBox.ItemTemplate>
        <DataTemplate>
            <StackPanel Width="456" d:DesignWidth="275" Margin="0,0,0,12" Background="Transparent">
                <toolkit:ContextMenuService.ContextMenu>
                    <toolkit:ContextMenu caliburn:Action.TargetWithoutContext="{Binding DataContext, ElementName=Purchases}">
                        <toolkit:MenuItem Header="edit" caliburn:Message.Attach="Edit($dataContext)"/>
                        <toolkit:MenuItem Header="delete" caliburn:Message.Attach="Delete($dataContext)"/>
                    </toolkit:ContextMenu>
                </toolkit:ContextMenuService.ContextMenu>
                <TextBlock Text="{Binding Description}" Style="{StaticResource PhoneTextLargeStyle}" VerticalAlignment="Bottom"/>
                <TextBlock Text="{Binding Cost, ConverterParameter=\{0:C\}, Converter={StaticResource StringFormat}}" Style="{StaticResource PhoneTextSmallStyle}" VerticalAlignment="Bottom" Foreground="{StaticResource PhoneAccentBrush}"/>
            </StackPanel>
        </DataTemplate>
    </ListBox.ItemTemplate>
</ListBox>
Hope this helps someone as it can be pretty tricky.


