Count Me In
25 Jan 2012 by Nigel Sampson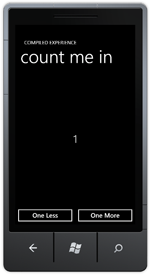 Never lose track of whatever you’re counting again. In this tutorial we introduce the Model, View, ViewModel (MVVM) pattern and cover binding values from the view model, wiring commands to the view using behaviours and changing the trigger of an action.
Setup
Before jumping into the tutorials head to developer.windowsphone.com to download the free tools and get them installed.
If you’ve done any work in the Silverlight / WPF world before you will have heard of the Model, View, ViewModel pattern. It’s the most popular UI separation pattern in Silverlight, we’ll do a brief introduction here, but if you want to look into the pattern more then take look at my series on creating a “Blendable MVVM Framework”.
Our counter application will have a simple view model, we’ll have current count as a property, two ICommand properties (Increment and Decrement). Silverlight by default didn’t contain an ICommand definition but Windows Phone 7 does (ActionCommand). To get the definitions we’ll need to add the following references.
- C:\Program Files\Microsoft SDKs\Expression\Blend\Windows Phone\v7.0\Libraries\System.Windows.Interactivity.dll
- C:\Program Files\Microsoft SDKs\Expression\Blend\Windows Phone\v7.0\Libraries\Microsoft.Expressions.Interactions.dll
Now that we have our new references we can create the ViewModel, it’ll need to implement INotifyPropertyChanged so the UI can track when things change and have the CurrentCount trigger the event. Normally I’d create methods for the Increment and Decrement operations and wrap them in the ActionCommand, however for such simple operations I can just a lambda method. Our view model should look like:
public class CounterViewModel : INotifyPropertyChanged
{
    private int currentCount;

    public CounterViewModel()
    {
        CurrentCount = 0;
        IncrementCount = new ActionCommand(p => CurrentCount += 1);
        DecrementCount = new ActionCommand(p => CurrentCount -= 1);
    }

    public event PropertyChangedEventHandler PropertyChanged;

    public ICommand IncrementCount
    {
        get; private set;
    }

    public ICommand DecrementCount
    {
        get;
        private set;
    }

    public int CurrentCount
    {
        get
        {
            return currentCount;
        }
        set
        {
            currentCount = value;
            OnPropertyChanged("CurrentCount");
        }
    }

    protected virtual void OnPropertyChanged(string propertyName)
    {
        var propertyChanged = PropertyChanged;

        if(propertyChanged != null)
            propertyChanged(this, new PropertyChangedEventArgs(propertyName));
    }
}
The UI again is pretty simple, two Buttons and a TextBlock to display the current count.
<Grid x:Name="ContentGrid" Grid.Row="1">
    <Grid.RowDefinitions>
        <RowDefinition Height="*"/>
        <RowDefinition Height="Auto"/>
    </Grid.RowDefinitions>

    <Grid x:Name="Buttons" Grid.Row="1">
        <Grid.ColumnDefinitions>
            <ColumnDefinition/>
            <ColumnDefinition/>
        </Grid.ColumnDefinitions>

        <Button Content="One Less"/>
        <Button Content="One More" Grid.Column="1"/>
    </Grid>

    <Grid Background="Transparent">
        <TextBlock x:Name="CurrentCount" HorizontalAlignment="Center" Style="{StaticResource PhoneTextExtraLargeStyle}" VerticalAlignment="Center""/>
    </Grid>
</Grid>
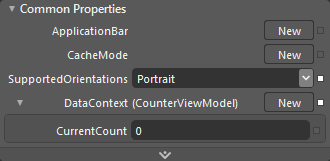
From here I find Expression Blend the easier tool so right click on your page and select “Edit in Expression Blend”. Now we’ll wire in our ViewModel, in the Objects and Timeline panel select the “[PhoneApplicationPage]”, under properties find DataContext, hit New and find CounterViewModel. Then select CurrentCount TextBlock, under “Advanced Options” select Data Binding and then the CurrentCount property of our ViewModel.
We’ll wire up the commands using Expression Blend Behaviours, unfortunately the out of the box InvokeCommandAction works differently than I expected so I’ve included a behaviour ExecuteCommandAction with the project. The code for it is outside of the scope of this tutorial but is included in the download.
From the Assets panel in Blend select ExecuteCommandAction and drag it onto the “One Less” button, and set its CommandName property to “DecrementCount”, do the same thing again for the “One More” button and the “IncrementCount” command. If you run the project now you’ll see we can now hit the buttons and change the current count really easily.

As part of the project I’ve also included another behaviour named “FlickTrigger”, this uses touch manipulation events, the implementation I’ll go over in another tutorial. Drag another ExecuteCommandAction into the Grid containing the TextBlock, set its CommandName = “DecrementCount”, but now hit New on the TriggerType and select the FlickTrigger and set the Direction property to Left. Do the same again for IncrementCount with a Direction of Right. Running the project now you should be able to flick the mouse left and right to raise and lower the count.
As with any tutorial discussing Expression Blend it’s easier to watch then to read, so here’s a quick video showing the wiring up the view model and commands.
Download the Code
The code for all the tutorials is available to download: Windows Phone 7 Tutorials Solution.


