Hold It Level
31 Jan 2012 by Nigel Sampson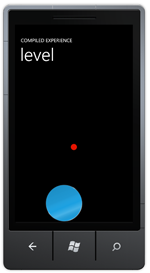 Try and keep the two circles aligned. How to use the Accelerometer to move an object around the screen, emulating this with Reactive Extensions and vibrating the phone.
Setup
Before jumping into the tutorials head to developer.windowsphone.com to download the free tools and get them installed.
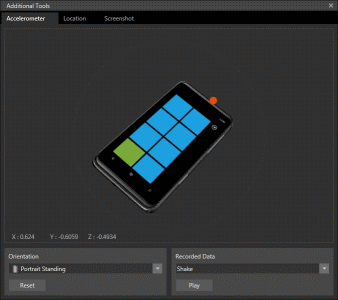
Much like the GPS in the previous tutorial dealing the Accelerometer in the emulator used to be a rather annoying experience. In previous versions of the development tools you couldn’t emulate the accelerometer in the tools, in thr 7.1 SDK you can. We’ll be using Reactive Extensions to emulate it in much the same way as the previous tutorial. Again like the GPS the Accelerometer has Start and Stop methods, and a ReadingChanged event. By default the emulator accelerometer only reads as if the phone was laying flat on a desk.
Because the constructor to AccelerometerReadingEventArgs is internal we’ll need to create our own AccelerometerReading class. There’s not much that frustrates me more than finding API’s or code I can’t use correctly due it either being made sealed or internal. The constructor for an event args is just annoying.
public class AccelerometerReading
{
    public double X
    {
        get; set;
    }

    public double Y
    {
        get; set;
    }

    public double Z
    {
        get; set;
    }
}
Our actual accelerometer observable is pretty simple, create the observable from the event and use Select to create the AccelerometerReading.
private IObservable<AccelerometerReading> CreateObservableAccelerometer()
{
    var observable = Observable.FromEvent<AccelerometerReadingEventArgs>(
        e => accelerometer.ReadingChanged += e,
        e => accelerometer.ReadingChanged -= e)
        .Select(e => new AccelerometerReading
        {
            X = e.EventArgs.X,
            Y = e.EventArgs.Y,
            Z = e.EventArgs.Z
        });

    accelerometer.Start();

    return observable;
}
The emulated accelerometer is a little more complicated, while we want to update the reading every 50 milliseconds we only want to change the direction every second. Using the Scan operator we can use an accumulator to return the previous value for all ticks except the ones on the second where we return a new direction.
private IObservable<AccelerometerReading> CreateAccelerometerEmulator()
{
    return Observable.Timer(TimeSpan.FromSeconds(0), TimeSpan.FromMilliseconds(50))
        .Scan(new AccelerometerReading(), (current, ticks) =>
        {
            var changeDirection = ticks % 20 == 0;

            if(changeDirection)
                return new AccelerometerReading
                {
                    X = random.NextDouble() 2.0 - 1.0,
                    Y = random.NextDouble() 2.0 - 1.0,
                    Z = -1
                };

            return current;
        });
}
Subscribing to the observable is again very simple, the important method again is the ObserveOnDispatcher to stop any cross thread UI access.
private void OnLoaded(object sender, RoutedEventArgs e)
{
    var useEmulation = true;

    var observable = useEmulation ? CreateAccelerometerEmulator() : CreateObservableAccelerometer();

    observable
        .ObserveOnDispatcher()
        .Subscribe(OnPositionChanged);
}
The subscribed method is fairly simple, calculating a new value for the bubble moving around the screen, if it falls out of bounds then we use the VibrateController to send some feedback to the user (again something not very useful in the emulator itself). We’ll also provide some colour feedback on the center ellipse if the two are close enough.
private void OnPositionChanged(AccelerometerReading reading)
{
    var left = Canvas.GetLeft(Bubble) + reading.X * 5;
    var top = Canvas.GetTop(Bubble) + reading.Y * 5;

    if(left < 0 || left + Bubble.ActualWidth > ContentPanel.ActualWidth || top < 0 || top + Bubble.ActualHeight > ContentPanel.ActualHeight)
    {

        VibrateController.Default.Start(TimeSpan.FromMilliseconds(100));

        return;

    }

    Canvas.SetLeft(Bubble, left);
    Canvas.SetTop(Bubble, top);

    var areOverlapping = left > 78 && left < 228 && top > 153.5 && top < 303.5;

    TargetFill.Color = areOverlapping ? Color.FromArgb(255, 49, 154, 49) : Color.FromArgb(255, 230, 20, 0);
}
Mango Update: New in the Windows Phone 7.1 SDK is the ability to emulate the accelerometer using the emulator tools, this is a much needed change and somewhat invalidates the requirements in this tutorial. However I’d still highly recommend playing with Reactive Extensions.
Download the Code
The code for all the tutorials is available to download: Windows Phone 7 Tutorials Solution.


