Reaction Time
26 Jan 2012 by Nigel Sampson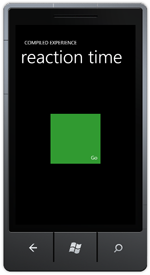 Test your reaction time, are you a sloth or a cheetah? We cover using the VisualStateManager, creating state transitions, using transforms and timing events using StopWatch.
Setup
Before jumping into the tutorials head to developer.windowsphone.com to download the free tools and get them installed.
Silverlight 2 introduced the concept of the Visual State Manager (WPF picked it up later on) to deal with different states within a control. The best example of States is the Button control, it has a number of states including Hover, Pressed etc. The VSM allows you to define any number of states (and group them together if necessary) and define transitions between these states.
For our Reaction Time application we’ll need four states:
- Base: The initial state of the application.
- Starting: The user has pressed ready and we’ve started a random timer.
- Waiting: Waiting for the user to hit the input, we’re timing how long we’re in this state.
- Finished: The user has hit the input, display the results.
Visual States are defined by using Storyboards to tell Silverlight how to change the current state, depending on your states this can lead to some very complicated XAML. Thankfully Expression Blend has some great tools to set up your states, so we’ll use this.
Once you have Blend open we’ll initially create our user interface, it’s going to look pretty messy to begin with as we’ll just be adding all the elements for all the states. We’ll need a ready button, some sort of target to hit, I’ll be using a grid, and some text blocks to display the results. In the end the xaml should be:
<Grid x:Name="ContentGrid" Grid.Row="1">
    <Grid.RowDefinitions>
        <RowDefinition/>
        <RowDefinition Height="Auto"/>
    </Grid.RowDefinitions>

    <Button x:Name="Ready" Content="Ready" Click="OnReady" VerticalAlignment="Center" Grid.Row="2">
        <Button.Projection>
            <PlaneProjection CenterOfRotationX="0"/>
        </Button.Projection>

    </Button>

    <Grid x:Name="Trigger" Background="#FFE61400" MouseLeftButtonDown="OnFinished" Width="200" Height="200" HorizontalAlignment="Center" VerticalAlignment="Center" RenderTransformOrigin="0.5,0.5">
        <Grid.RenderTransform>
            <CompositeTransform ScaleX="0" ScaleY="0"/>
        </Grid.RenderTransform>

        <TextBlock x:Name="Message" HorizontalAlignment="Right" Margin="0,0,12,12" Style="{StaticResource PhoneTextNormalStyle}" TextWrapping="Wrap" Text="Ready" VerticalAlignment="Bottom"/>
    </Grid>

    <StackPanel x:Name="Results" VerticalAlignment="Center" HorizontalAlignment="Left" Orientation="Horizontal">
        <StackPanel.Projection>
            <PlaneProjection CenterOfRotationX="0" RotationY="90"/>
        </StackPanel.Projection>
        <TextBlock Style="{StaticResource PhoneTextLargeStyle}" TextWrapping="Wrap" Text="Your time was"/>
        <TextBlock x:Name="Time" Style="{StaticResource PhoneTextAccentStyle}" TextWrapping="Wrap" FontSize="32"/>
    </StackPanel>
</Grid>
When we have all the elements on the stage we’ll hide the ones that shouldn’t be displayed for our Base state, we’ll scale the Grid the user will hit down to zero and rotate the results towards the user. We do this by modifying the Scale section under the Transform properties with the X and Y down to zero for our grid, and for the results the Y element of the Perspective Rotation Transform to 90. One thing we’ll have to change is the centre of rotation to the left hand side of the element to get that book style rotation we do this by setting the X centre of Perspective Rotation to 0.
With the user interface in place we can now go through and create our states. On the States tab we create a new State Group named “ReactionStates”, the group names are just for reference purposes. A control can be in a state for each state group, we’ll only need one state group. From there add three more states, named “Starting”, “Waiting” and “Finished”, since we want animation between our different states we set the “Default Transition” to 0.5 seconds. However we want the transition from “Starting” to “Waiting” to be instant, so on the “Starting” state select Add Transition picking the transition for “Starting to “Waiting”, we can then change the transition time for this specific transition down to zero.
Now with all our states in place we can go through and modify each state with the look we want. Select the “Starting” state in the States panel, you’ll notice “Starting state recoding is on” displayed, this means any property changes you make now will be recorded as part of the state change. Go ahead and change the scale on our target grid back to 1.0 and rotate the “Ready” button out of the way.
In the “Waiting State” we’ll make the same changes as the “Starting” state as well as change the colour and text inside it. For the finished state we’ll leave the Target scaled down but Rotate the results back in, and that’s it, you can click through the states to see how the application will look for each. This is a tough series of steps to explain in text so here’s a video of me setting this up.
And now for the code, it’s pretty simple, we’ll create three objects, a DispatcherTimer to handle the random delay till we start waiting, a Stopwatch to time how long we waited for and a Random to generate random times. Hook up the method OnReady to the ready buttons click event, we’ll set the DispatchTimer to a random interval and start it. We then come to the important method VisualStateManager.GoToState, this tells the state manager to change the appropriate control (in this case “this”) to the given state.
When the timer ticks we stop the timer, start the stopwatch and change to the next state. We’ll hook up the OnFinished method to the LeftMouseButtonDown event of our target grid, this checks our state, displays the appropriate results and changes the state again. In the end the code looks like the following:
public partial class MainPage
{
    private readonly Random random = new Random();
    private readonly DispatcherTimer dispatchTimer = new DispatcherTimer();
    private readonly Stopwatch stopwatch = new Stopwatch();

    public MainPage()
    {
        InitializeComponent();

        dispatchTimer.Tick += OnBeginWaiting;

    }

    protected void OnReady(object sender, RoutedEventArgs e)
    {
        dispatchTimer.Interval = TimeSpan.FromSeconds(random.Next(2, 5));
        dispatchTimer.Start();

        VisualStateManager.GoToState(this, "Starting", true);
    }

    private void OnBeginWaiting(object sender, EventArgs e)
    {
        dispatchTimer.Stop();

        stopwatch.Start();

        VisualStateManager.GoToState(this, "Waiting", true);
    }

    protected void OnFinished(object sender, MouseButtonEventArgs e)
    {
        if(stopwatch.IsRunning)
        {
            stopwatch.Stop();

            Time.Text = String.Format("{0} ms", stopwatch.ElapsedMilliseconds);
        }
        else
        {
            dispatchTimer.Stop();

            Time.Text = "Too quick!";
        }

        VisualStateManager.GoToState(this, "Finished", true);
    }
}
Download the Code
The code for all the tutorials is available to download: Windows Phone 7 Tutorials Solution.


