Snowfall
28 Jan 2012 by Nigel Sampson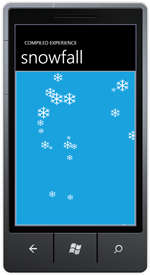 A simple animated snowfall, swipe for wind. To build this we cover creating and using user controls, reading manipulation events and setting up the clip for a panel.
Setup
Before jumping into the tutorials head to developer.windowsphone.com to download the free tools and get them installed.
While this application is light on useful functionality it highlights a very useful technique when building larger applications, refactoring common UI elements into User Controls. We’ll use cover a little bit about Manipulation events to simulate some wind for our snow.
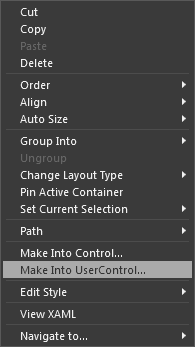
User controls are a reusable piece of xaml and code behind much like the pages you’ve been working with already, the major difference is that they inherit from UserControl and not PhoneApplicationPage. You can create them two different ways, the first is the by right clicking on the project, selecting “Add New Item” and choosing Windows Phone User Control, This will give you a blank user control for you to use. The second method uses Expression Blend, if you’re already building your UI and come across a chunk of xaml that you want to reuse you can select it, right click and select “Make into User Control”, this will automatically create you a new user control with the selected content inserted inside, it then replaces your currently selected content with your new user control.
So once you’ve created a user control what can you do with it? Well this demo application with be dealing with them programmatically but if you look in Blend’s Asset Panel under Project you’ll see your newly created user control, simply drag it onto your page to use it. Simple as that!
Back to our application, first we’ll out need our snowflake user control, I hunted down some snowflake vector art and ended up using some found on Vecteezy. Once the .ai file was downloaded I used “Import Adobe Illustrator file” under the File menu, deleted most of it and picked out a single snowflake path. With the path selected I used “Make into User Control” to create the control itself. In the user control itself I made sure it had a Transparent background and that Path object and a Fill of White and a Stretch of Fill. What this allows me to do is to set the Width and Height of the user control and have the path scale with it.

Our Main page is pretty simple, since we’ll be directly manipulating the positions of our snowflakes a Grid isn’t the best Panel for this, what we’ll need is a Canvas, this will let us set the attached properties Canvas.Left and Canvas.Top to position items. In Blend in the Objects pane select the Grid named “LayoutRoot”, right click and under “Change Layout Type” pick Canvas, I’ve given it a Background of the PhoneAccentBrush and ended up wrapping it in a border. One thing that’s important to know is that Panels (Grid, Canvas etc) do not by default clip objects at their boundaries, by this I mean that if you lay something that will stick outside the panel, you can affect how things are clipped by using the Clip property. We’ll set our Clip property to a rectangle that’s the full width and height of our Canvas, nothing complicated, it will just stop snowflakes that are right at the top of the canvas sticking out over the title text.
<Border Grid.Row="1" BorderThickness="{StaticResource PhoneBorderThickness}" BorderBrush="{StaticResource PhoneBorderBrush}">
    <Canvas x:Name="ContentCanvas" Background="{StaticResource PhoneAccentBrush}"
       ManipulationDelta="OnManipulationDelta">
        <Canvas.Clip>
            <RectangleGeometry Rect="0, 0, 474, 611"/>
        </Canvas.Clip>
    </Canvas>
</Border>
Our process for the snowflakes will be simple, not a complicated physics system. On Load we’ll create 25 copies of our user control at random positions and sizes and add them to the Canvas. We then start a DispatchTimer running at approximately 20 fps.
private void OnLoaded(object sender, RoutedEventArgs e)
{
    CreateInitialSnowflakes();

    timer.Start();
}

private void CreateInitialSnowflakes()
{
    for(int i = 0; i < 25; i++)
    {
        var left = random.NextDouble() ContentCanvas.ActualWidth;
        var top = random.NextDouble() ContentCanvas.ActualHeight;

        var size = random.Next(10, 50);

        CreateSnowflake(left, top, size);
    }
}

private void CreateSnowflake(double left, double top, double size)
{
    var snowflake = new Snowflake
    {
        Width = size,
        Height = size
    };

    Canvas.SetLeft(snowflake, left);
    Canvas.SetTop(snowflake, top);

    ContentCanvas.Children.Add(snowflake);
}
User controls are just about reusing xaml, they’re also about reusing and abstracting code, we’re going to add two methods to the code behind of our Snowflake, the first UpdatePosition takes vector that is the wind directio (we’ll get into setting this up later) and updates it’s position based on that wind and simulation of gravity. The second, IsOutOfBounds, returns true if the snowflake is off the canvas, there are some important things to note about this, Canvas.Left and Canvas.Top measure from the top left corner of the user control so the calculations for the left and right side are a little different. We’re also not checking the top edge of the canvas because if any snowflakes are blown up they’ve eventually come back into the canvas thanks to gravity.
public partial class Snowflake
{
    public Snowflake()
    {
        InitializeComponent();
    }

    public void UpdatePosition(Point currentTransform)
    {
        var top = Canvas.GetTop(this);
        var left = Canvas.GetLeft(this);

        Canvas.SetTop(this, top + 5.0d + (currentTransform.Y 0.1d));
        Canvas.SetLeft(this, left + (currentTransform.X 0.1d));
    }


    public bool IsOutOfBounds(double width, double height)
    {
        var left = Canvas.GetLeft(this);
        var top = Canvas.GetTop(this);

        if(left < -ActualWidth)
            return true;

        if(left > width + ActualWidth)
            return true;

        if(top > height - ActualHeight)
            return true;

        return false;
    }
}
With these two methods in hand our Timer tick event handler is really simple, iterate through all our snowflakes, call UpdatePosition, then check if it’s out of bounds and remove it if it is. We’ll then slowly scale our wind down.
private void OnTimerTicker(object sender, EventArgs e)
{
    var snowflakes = ContentCanvas.Children.OfType<Snowflake>().ToList();

    foreach(var snowflake in snowflakes)
    {
        snowflake.UpdatePosition(currentTransform);

        if(snowflake.IsOutOfBounds(ActualWidth, ActualHeight))
        {
            ContentCanvas.Children.Remove(snowflake);
            AddNewSnowflake();
        }

        currentTransform.X = currentTransform.X 0.999d;
        currentTransform.Y = currentTransform.Y 0.999d;
    }
}

private void AddNewSnowflake()
{
    var left = random.NextDouble() * ContentCanvas.ActualWidth;
    var size = random.Next(10, 50);

    CreateSnowflake(left, 0, size);
}
So where’s this wind coming from? From you! The experience we’ll be going for is to be able to brush your finger / mouse across the screen and have the snowflakes blow in the wind. We do this through what are called Manipulation events. Every UI element in Silverlight exposes three events ManipulationStarted, ManipulationDelta and ManipulationCompleted, depending on how you want your elements to react to touch will depend on which events are going to be required. Since we want to react as your finger moves across the screen we’ll be using ManipulationDelta, if we only wanted the wind to start when the user had stopped dragging their finger we’d use ManipulationCompleted but that feels weird when in user.
The ManipulationDeltaEventArgs contains all the manipulation data we’ll need, we’ll be using the CumulativeManipulation property which contains the entire total manipulation, if you only want the different difference from the last event you can use DeltaManipulation. We won’t do anything complicated, simply store the current manipulation as the wind vector.
protected void OnManipulationDelta(object sender, ManipulationDeltaEventArgs e)
{
    currentTransform = e.CumulativeManipulation.Translation;
}
One thing to note is that the performance of this application is tied to the speed of the computer running the emulator. I’d love to test this on a real phone but ultimately will need to tweak numbers when we can do performance testing. The real thing to remember is that you can also build for the Windows Phone 7 using the XNA framework, this allows for high performance graphics so depending on your requirements it may be a better fit.
Download the Code
The code for all the tutorials is available to download: Windows Phone 7 Tutorials Solution.


